Tuesday, June 02, 2009

Meal planning

Frozen dumplings
Seared sesame shrimp
Soba with shitake dashi

Grilled chicken breast
Green salad with roasted peppers & basil vinaigrette
Carmelized corn

Tandoori grilled chicken
Indian spiced potato salad
Mixed pickled veggies
Frozen chai

Smoked salmon
Lentil salad with feta

Sunday, September 23, 2007

Watermelon Gazpacho


During a visit to NYC, I met up with my friend Pete for lunch at Isabella's. We grabbed a table on the sidewalk and settled in to a three course fixed-price meal - a bargain for about $20 which in my case included soft shell crabs as the main dish and 
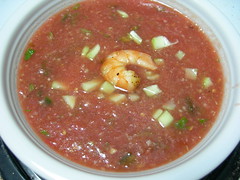
tiramisu for desert. The starter I chose was a fabulous Watermelon Gazpacho with blackened shrimp. When we got back to sweltering NC in the midst of 100 degree plus weather, I attempted to recreate the dish using a recipe I found. The results were pretty good, all things considered.

What we discovered is that a little gazpacho goes a long way - especially with the amount of olive oil called for in this recipe. It may be a good idea to scale back a little on the oil or plan for a very modest serving. Very tasty, but very rich. I also learned that the smell of poorly sealed watermelon gazpacho tends to permeate the entire refrigerator - causing ice and other stuff to absorb that flavor. You have been warned.

This is the recipe from the Boston Globe co-opted from the Straight Wharf Restaurant -

2 medium cucumbers, peeled, seeded, and diced (about 2 cups)
1/2 cup olive oil, plus 2 tablespoons for garnish
1/4 cup sherry vinegar, or to taste
Salt and pepper, to taste
1 tablespoon sugar, or more to taste
1 bunch scallions, thinly sliced
1/4 cup chopped fresh cilantro
2 jalapeno peppers, seeded and finely chopped
1/4 cup lime juice

1. Peel tomatoes with a serrated peeler or cut a small X in the bottom of each, blanch in boiling water for about 30 seconds, then transfer to ice water and slip off the skins. Discard seeds and chop the flesh. You should have about 4 cups.
2. Reserve 2 tablespoons tomato, 2 tablespoons watermelon, and 2 tablespoons cucumber for garnish.
3. In a food processor, combine the remaining tomato, watermelon, and cucumber. Blend until smooth. Add 1/2 cup of olive oil, sherry vinegar, salt, pepper, and sugar. Pulse to combine.
4. Transfer the mixture to a large mixing bowl. Stir in the scallions, cilantro, jalapeno peppers, and lime juice. Taste for seasoning and add more salt or vinegar, if you like. Cover and refrigerate for several hours or until chilled.
5. Ladle the gazpacho into 8 bowls. Garnish each with remaining chopped tomatoes, watermelon, cucumbers, and a drizzle of olive oil.

Sunday, June 10, 2007

Cedar Plank Tilapia


We bought some cedar planks at the Carrboro Farmer's Market with the intent to grill some type of fish. I was somewhat familiar with the concept of grilling trout but since tilapia was on super special at the Teeter, the choice was made for us. I'll have to admit I was more than a bit skeptical about the impact the cedar would have on the taste. I've grilled with hickory chips before and always love the taste charcoal grilling gives -but always felt that these were more nuances than the main show.

We marinated the tilapia fillets in Scott's Barbeque sauce (Scott's is good for more than just pork and chicken) for a couple hours prior to grilling. I thought that with a sauce that powerful, we'd barely be able to tell the difference between plank grilling or normal grilling. Boy, was I wrong. The tilapia just soaked up the cedar smokiness and served as a wonderful compliment to the marinade.

The following are the instructions --

Soak the cedar plank well - ideally at least a few hours, but the longer the better. Set up the grill for direct grilling on medium-high. When ready to cook, place the plank on the hot grate and leave it until there is a smell of smoke, about 3 to 4 minutes. Turn the plank over and place the fish on top. Cover the grill and cook until the fish is cooked through, reaching an internal temperature of 135 degrees. Check the plank occasionally - if the edges start to catch fire, mist with water, or move the plank to a cooler part of the grill. Cooking time will probably be about 20-25 minutes.

Saturday, June 09, 2007

Grilled stuffed chicken breasts


It's not really a big secret - but we eat a lot of chicken. To prevent chicken fatigue, sometimes it's necessary to kick things up a notch and take the old-school grilled chicken breast to a new level. With some sage advice from my grilling mentor Steven Raichlen - we tweaked his basic recipe just a bit with some really tasty results.

Ingredients
3 -4 large chicken breasts
7-8 large basil leaves or equivalent
5-6 pieces of sun dried tomatoes
1 chunk of asiago cheese

Marinade
1 cup olive oil
juice from 1 lemon
2-3 crushed garlic cloves
salt
pepper

Trim the "tenderloins" and any fat off the chicken breasts and cut each breast in half. Place each half flat on a cutting board and, using the palm of one hand to hold the breast flat, cut a deep horizontal pocket in the side with a slender knife. Make the pocket as large as you can without piercing the top or bottom of the breast. As for the stuffing, we chose to use asiago cheese, fresh lemon basil leaves, and sun-dried tomatoes - but pretty much anything within reason would work. Insert the stuffing into the pocket and seal the breast with toothpicks. Lay the breasts in a flat pan and cover with the marinade, flipping a couple times to coat both sides. We marinated for 20-30 minutes, but the real flavor comes from the stuffing. Grilling time is basically the same as for normal chicken breasts - probably 10 minutes or so on medium high.

This is a really easy, quick way to spice up the usual chicken breast routine and also provides a way to show off some fancy grill marks on the outside and an impressive cross section of flavors on the inside. This is something we'll definitely be doing again.

Monday, May 28, 2007

Burger time - Blackwood Picnics


Much like there is no excuse for our recent lapse in posts, there is no excuse for eating a dry, tasteless, boring burger when there are some very easy and tasty alternatives. I picked up some ground bison at the Carrboro Farmer's Market as a different twist - usually, we steer towards turkey burgers but on occasion I'll partake of some old fashioned red meat. The trick with an extra lean type of meat like bison (or extra lean turkey/beef ) - is how to preserve that juiciness a true burger connoisseur expects. We start with this mixture - the egg provides that extra moisture and helps to bind things together for better patty formation:

1 pound ground bison
1/2 cup bread crumbs
1 egg
salt
pepper

The secret ingredient, however, is a pat of flavored butter. Once the meat mixture is done and the patties have been formed, you separate each patty into two halves, insert the butter in the middle and seal things back up again. The same trick can also be used with blue cheese (especially good with turkey) - but this time out, rosemary butter was the condiment of choice. Once the burgers were grilled to satisfaction, the spread was completed with a ciabatta bread roll, fresh lettuce and tomatoes from the farmer's market, pickles, ketchup, and a little bit of mayo and mustard. I know we're in North Carolina, but chili and slaw has no place on this burger.

And although it's not in season yet - we picked up some corn from the HT to throw on the grill as well. Similarly, butter application is the key to good grilled corn. Remove the corn silk and jam some flavored butter inside the husk, as well as salt and pepper. Throw the corn on the grill - husk and all, and let the grill do the work. Indirect heat is probably the better option - but lower heat will work as well.

Burgers, grilled corn, and cold beer in the backyard cannot be beat on a warm weekend afternoon. Pick yourself up some bison and get to work!